Showing posts with label Embossalicious Embossing Folders. Show all posts

Tuesday, 15 November 2016

An Autumnal Thank You

I made this card with some of the new goodies that I got at the Hobbycraft show at the SECC last month; I had such a spend up, I'd saved up all year and it was great to have a big splurge, and I'm loving having new toys to play with.
The stamps used here aren't new, and neither is the embossing folder, but the dies, waxes, paint and embossing powders are.

To make the topper, I heat embossed the Woodware stamp with bronze embossing powder, and went round the image with two shades of grey coloured pencil to make it pop.  I then used to Stampendous Embossing Enamels round the edges of the topper, Shabby White and Aged Bronze, for a distressed look.  To colour the berries, I painted on Imagination Crafts Starlights Paint in Red, then once it had dried, I covered each one with Glossy Accents.  This gives the berries an enameled look that hasn't been captured in the photos.
The background was created by embossing a piece of kraft card with an Embossalicious folder, then applying Imagination Crafts Alchemy Waxes in three colours to it; I used Copper, Bronze and Coral.
The sentiment was stamped with a Personal Impressions stamp and I used copper and red mirri for the matting and layering.
To embellish, I used a Tonic die set to make some leafy die cuts from kraft, which I inked with Ground Espresso Distress Ink.  The final touch was to add a few gems.


I'm entering this card in the following challenges -
Crafty Cardmakers - #177 - Embossing
Sparkle 'n' Sprinkle -  Anything Goes with Loose Product
The Crazy Challenge - #235 - Thank You
Fashionable Stamping - #117 - Tis the Season - Autumn
Pile It On - #121 - Thank You
Crafty Calendar - Autumn Colours
Creative Corner - Thank You
The Stamping Boutique - Fall Colours

Thursday, 13 October 2016

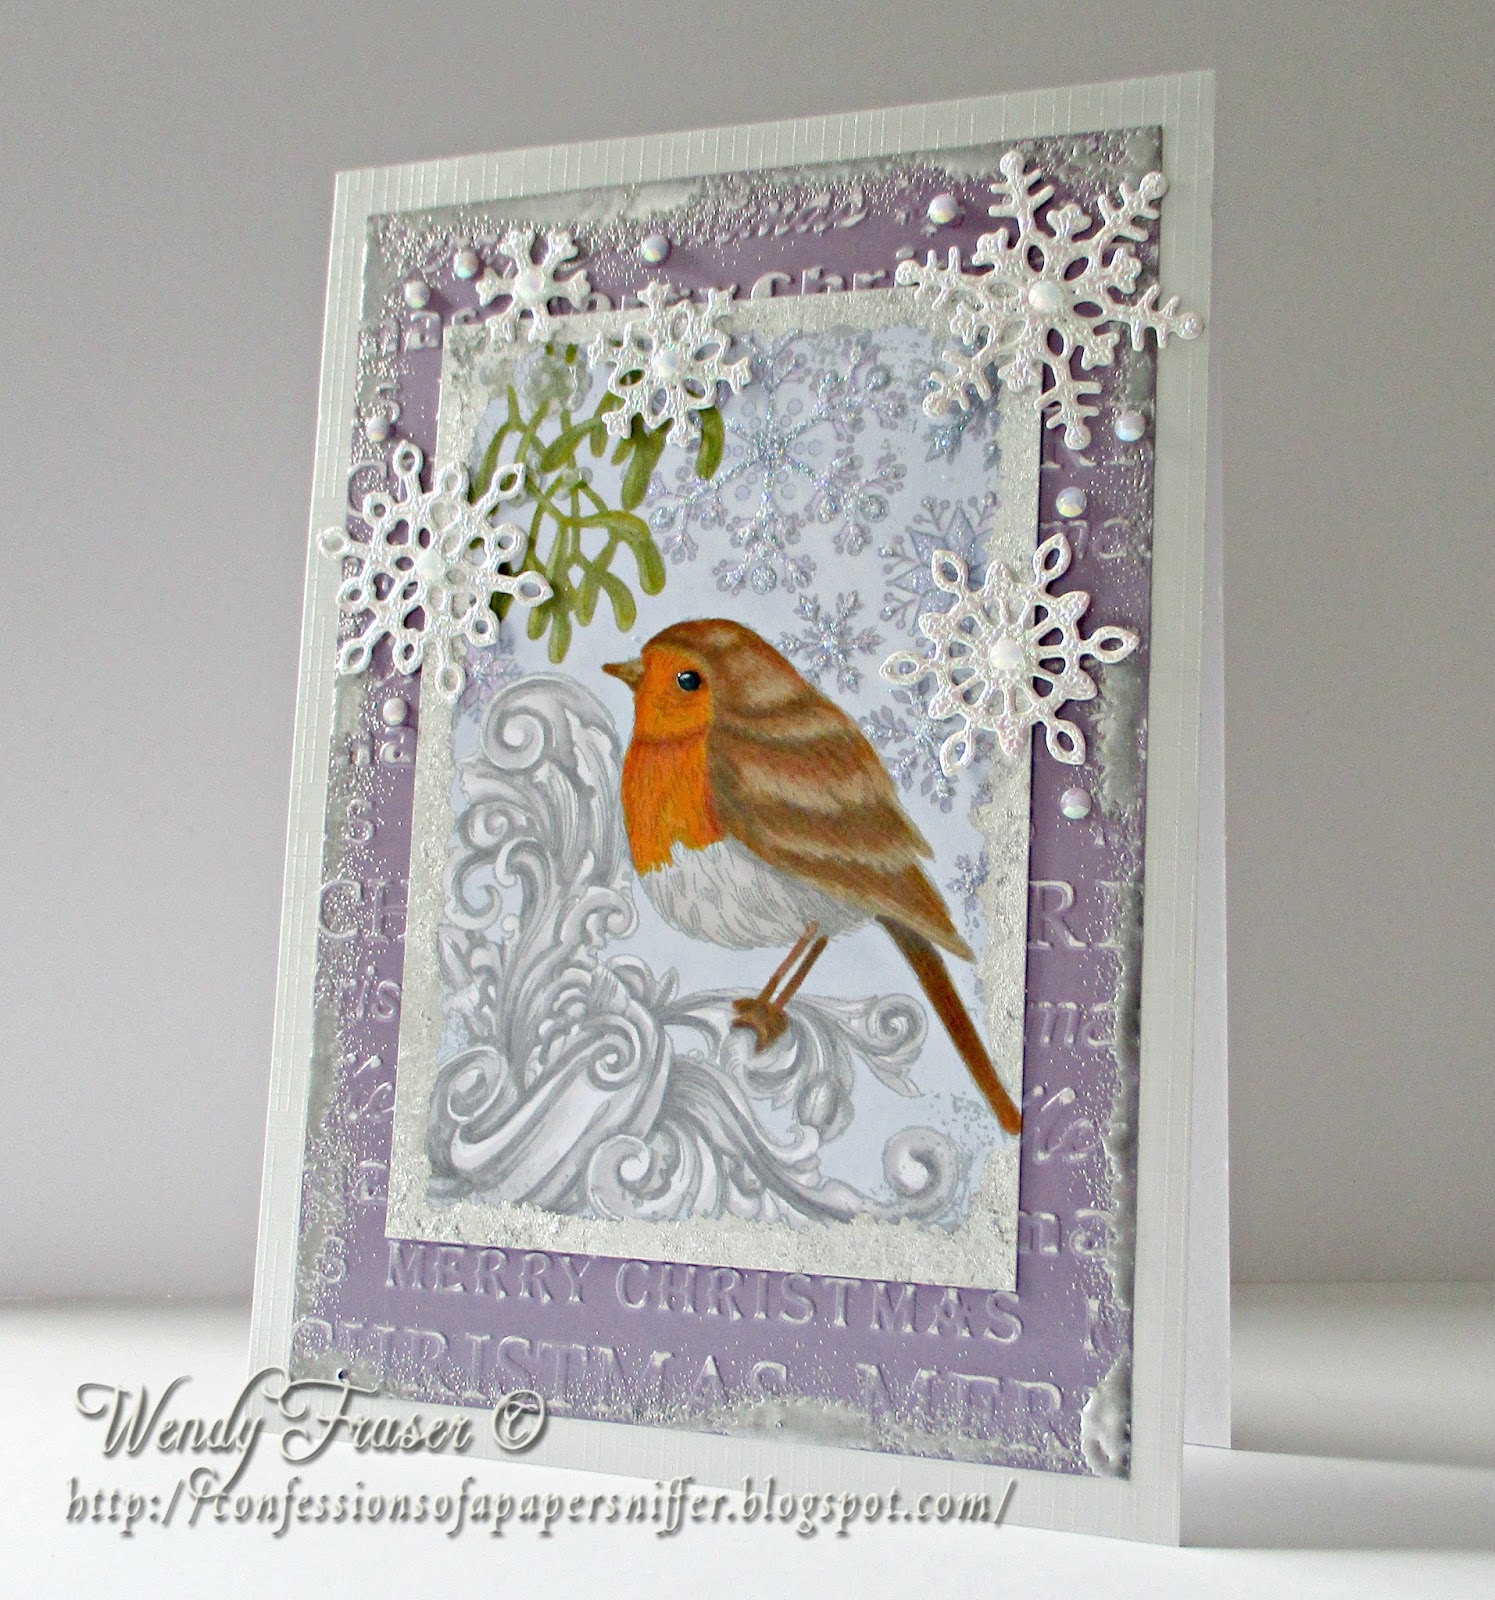
Christmas Robin

This one has got everything but the kitchen sink thrown at it: Promarkers, gilding flakes, embossing powder, glitter glue, Glossy Accents, and die cuts.  It's been dry embossed and sanded too!
 I used a stamp called Rockin' Robin from Indigo Blu to create the topper.  It's one of those stamps that's really designed for inky techniques or gilding flakes, but I decided to colour it with my Promarkers.  I stamped it in London Fog Memento for a pale image because there is a lot of dark line work that would have been overpowering in black, then worked in with my pens.  After colouring, I went round the edges of the topper with a Nuvo glue pen and added silver gilding flakes.  I also added Star Dust Stickles to the snowflakes and Glossy Accents to the bird's eye and mistletoe berries.
I made my own backing paper embossing a piece of lilac satin board with an Embossalicious folder, I then sanded it back and added some silver embossing powder to the edges and heated it up.
To finish off, I added some snowflakes made with Sweet Dixie dies from shiny, textured paper, and added a sprinkling of iridescent gems.

I'm entering this card in the following challenges -
Christmas at Sweet Stampin' - Glitter 'n' Sparkle
Fab 'n' Funky - #322 - Shades of Grey or Lots of Sparkle - I've gone for sparkle
Incy Wincy - All That Glitters
Addicted to Stamps - #133 - Embossing
Pile It On - #118 - Sparkle
Robyn's Fetish - #337 - Nature
Crafty Girls Creations - #27 - Anything Goes
Cardz 4 Galz - #33 - Use at Least One Die

Wednesday, 28 September 2016

Bring Us Some Figgy Pudding

I borrowed an Xcut die set of my Mum's to make this card; I was so pleased when she bought it because I knew I'd get to play with it!
I created the card blank with Grand Spellbinders dies, and added some interest to the plain circle, that I cut from Stardust card, with an Embossalicious embossing folder.  I used a section of doily that I highlighted with Star Dust Stickles to create a sparkly Christmas tablecloth, it shows up so much better in reality than it does in the photos.
I used Mum's Xcut die set to make the pudding and all the accessories, it even comes with a die to cut a little sixpence.
To finish, I stamped a sentiment and cut it out with a Sizzix tag die, topping it with a tiny clear gem.

I'm entering this card in the following challenges -
Holly Jolly Christmas - #81 - Technique Challenge - I chose embossing
Dream Valley - #141 - Embossing
Get Creative - #48 - Embossing
Robyn's Fetish - #335 - Use an Embossing Folder
QKR Stampede - #210 - Embossing

Monday, 12 September 2016

Cutie Pie DT Card - Birthday Party

It's our 5th birthday at Cutie Pie, and to celebrate, our challenge theme this month is "Birthday Party".
We have lots of prizes up for grabs this month as we have FIVE fabulous sponsors - Crafty Ribbons, Di's Digi Downloads, Crafty Sentiments Designs, Robyn's Fetish, and Bugaboo.
I've used a Bugaboo image from my own collection to create my DT card, colouring the digi with my beloved Promarkers.  I added a little Old Paper Distress Ink to the edges of the topper for definition.

The background was embossed with a bunting design using an Embossalicious folder and the topper and frame were cut with Spellbinders Grand dies.  the bunting was made with a Joy die and the birthday cake embellishment was made with dies from my Xcut Birthday Party set.

I'm entering this card in the following challenges -
Sweet Stampin' - Cute and Cuddly
Brown Sugar - #215 - Anything Goes
Simply Papercraft - #36 - Anything Goes
4 Crafty Chicks - #315 - Birthday
Seize the Birthday - Birthday + Frames
The Paper Shelter - #263 - Embossing
Artistic Inspirations - #163 - Anything Goes
Ooh La La - #213 - Anything Goes

Saturday, 18 June 2016

Frosty Wreath

A Christmas card in contemporary colours today, using my Spellbinders Build a Wreath die, which I haven't used for quite a while.  I decided against cutting it in traditional green and went for frosty white with plenty of shimmer instead.
 As mentioned before, the wreath and bow were cut with Spellbinders Build a Wreath dies; I used off white pearl card for the wreath and, once assembled, gave it a spritz of iridescent Spray and Sparkle before adding the bow and decorating it with some Star Dust Stickles to make it look like fancy edged wired ribbon.  I then embellished the wreath with an assortment of gems and pearls.
I used white Stardust card for the background, embossing it with an Embossalicious Christmas embossing folder, instead of using pattered paper.  The large pink circle was cut with a Grand Spellbinder die and the corner elements were cut with a Marianne die.
The final touch was to add a border of Liquid Pearls to the pink edges and to the fancy circle.

I'm entering this card in the following challenges -
Simply Papercraft - #31 - Anything Goes
That's Crafty - In The Pink
Winter Wonderland - Add Some Sparkle
CRAFT - #368 - Christmas
Crafting By Designs - Get Ready For Christmas
Crafting With Friends - #23 - Anything Goes